Issue – Stage Grid
Precise placement of dancers on the stage is sometimes difficult to determine by looking into the often dark void of the theater stage. This issue, along with difficulty in determining exact depth of entrances and exits, may be aided by the use of a grid on the stage. Much attention is placed on the staging of dancers in the choreographic process. These details may be more accurately and efficiently recreated when documented using the grid as a spatial mapping tool.
The Stage Grid
Techniques/Recommendations
Horizontal and vertical lines may be added to the stage in a matter of minutes to provide spatial references for video documentation. Blue painter’s tape works well in that it is of a color and value that works well with most cameras. Additionally, the use of such a grid contributes to the spatial accuracy and consistency of dancer’s performance. One may consider using this grid even in rehearsals. Vertical lines may be placed on center and quarter marks, and horizontal lines may be used to define the depth of side wings. The addition of vertical markers on the legs of the stage help to clarify the wings used for entrances and exits.
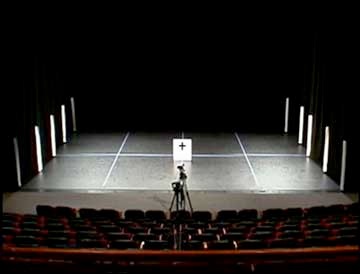
First Version of a Stage Grid Used by Tim Glenn at Florida State University
Here, "Cloven Marks" are used in place of quarter marks in the Paul Taylor American Modern Dance Company's modified Stage Grid.
Issue – Choreographic Details
Detailed documentation of dance involves capturing much more than the temporal and spatial components of choreography. Unique vocabulary and dynamic intent are essential in fully recording the dance event. Intricate grips, precarious weight-sharing, and qualitative nuance must be included and may require additional methods of documentation. Performative elements of choreography are often best communicated from the voice of the creator. A recording of the choreographer coaching a movement phrase can be the most accurate resource for documenting count structure, effort, and phrasing.
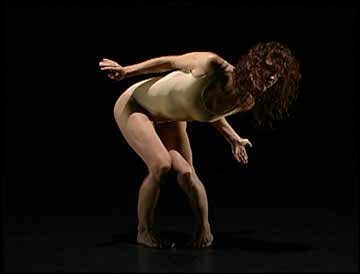
Wallie Wolfgruber's Hatch requires a close-up shot to capture choreographic details.
Techniques/Recommendations
Much time is spent embodying choreographic vocabulary by viewing dance on video. By placing value on the documentation of intricate moments within a dance one may significantly decrease the amount of time necessary for learning through the video medium. Dancers performing the dance know better than anyone the areas that may be problematic to recreate. A shot list of “outtakes” should be prepared by the dancers, in conjunction with the choreographer, prior to beginning a shoot. Cameras should be brought close to the stage for recording the list of intimately detailed moments. It may even be useful to record the dancers describing the progression of movement. Another possibility is to record at least the base phrases of a dance simultaneously from the front and back. This provides information on the dance from two different views and introduces the idea of documenting from the dancer’s perspective, which is discussed below.
Phrase from Dolly Sods: After the Flood by Dan Wagoner with coaching from the choreographer
Duet from Dolly Sods: After the Flood by Dan Wagoner with simultaneous front and back view
![]()
Issue – Staging Stills
No single performance is ever exactly like another, and that is what makes live performance exciting and unique. Accepting this fact, choreographers work with the stage as their canvas with the hopes that their movement paintings will approximate the same series of images each time they are performed. Each moment of a dance involves choices in placement that result in some sense of design and balance. In essence, dance may be seen as an ongoing series of flashcards, each containing its own compositional arrangement of dancers in space. Documenting these snapshots helps inscribe the artistic intent, at least spatially, of the choreographer.
Techniques/Recommendations
Although video does a nice job of recording placement of dancers in space and time, a single performance is hardly ever executed exactly as the choreographer may have intended. By identifying the landmark moments in a dance where spatial composition on the stage is significantly important we may create a list of key pictures that can be viewed out of the context of performance, clarified by the choreographer, and then recorded. A bird’s eye view of the stage, or a camera positioned at a very high vantage point works well for this type of stop-action recording. Once all key moments have been recorded a connect-the-dots version of the dance may accompany the full performance of the work on video.
Staging Stills from Section 1 of Dolly Sods: After the Flood by Dan Wagoner
![]()
Issue – Dancer’s Perspective
Dancers learning a dance from video face the age-old problems of reversing what you see in the video monitor, flopping the image by viewing in a mirror, or watching the monitor over your shoulder while attempting to dance. Sound familiar? Documenting from the dancer’s perspective can easily remedy all these problems, while simultaneously reducing the need for massage therapy on the neck!
Techniques/Recommendations
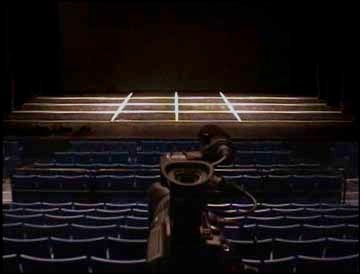
While everything is set up and ready for documenting dance, simply record a run of the dance while having the dancers perform using upstage as front. Simple? Maybe for the videographer…but dancers will need some time to orient themselves to the new facing prior to performing. During this shot have the dancers simulate all details of performance, including waiting in the wings for an entrance. After all, being seen off stage in the wing awaiting an entrance adds more detail to the dance, and that is the purpose of documentation. In our dream facility for documentation, there would be enough depth to simultaneous record a single run of a dance from front and back.
Audience Perspective of introduction to Dolly Sods: After the Flood by Dan Wagoner
Dancer's Perspective of introduction to Dolly Sods: After the Flood by Dan Wagoner
![]()
Issue – Costuming
Costumes used in performance are not always the best for revealing the details of underlying movement. This, along with the difficulty in following the person on video dancing your role in a group work, brings us to the question of how costuming can aid in the documentation and reconstruction process. The use of visually distinct, formfitting costumes that record well on video can significantly improve the readability of documented movement. As costumes assist documentation, so may documentation assist costumes by inscribing the memory of costume details in a digital medium. Costumes must sometimes be recreated from the images of them on video, thus including detailed documentation of each costume can help designers more accurately reconstruct in the likeness of the originals.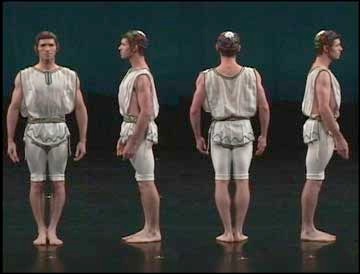
Male Costume Parade for Paul Taylor's In the Beginning
Techniques/Recommendations
When conducting a recording session specifically for documentation, consider costuming each dancer in a solid-colored unitard or leotard. Extreme values, similar hues, and colors not easily recorded by some video cameras should be avoided. This technique helps clarify each role in the dance, making each dancer’s sequence of entrances, exits, and pathways easily perceivable. During a performance documentation session in full costume, consider taking the time to have each dancer model their attire from multiple facings for the camera. Complex costume mechanics and details of quick changing sequences may also be valuable to have recorded. This “costume parade” can be invaluable to future costume designers charged with the task of recreating original costumes without access to the actual costumes.
Costume Change for soloist Andy LeBeau in Paul Taylor's In the Beginning
Costume Details for soloist Andy LeBeau in Paul Taylor's In the Beginning
![]()
Issue – Synchronization
Much time can be saved in post-production editing by pre-planning the synchronization of multi-angle documentation sessions. Like in the film industry, it is important to develop a protocol for calling shots that includes some sort of synchronizing element. Thinking about sync prior to recording helps up to take advantage of technologies such as device control, batch capture, and timecode-based editing. 
Timecode
Techniques/Recommendations
Documentation Directors are responsible for establishing and implementing a shooting protocol to ensure consistency from tape to tape. The purpose of this operating sequence should be clearly understood by all crewmembers. Once all cameras are called to record, a synchronizing cue should be executed in view of all cameras. This can be as simple as a clap of the hands, the strobe of a flashcube, or the closing of a clapper, as often used in film. If recording is disrupted, another sync will be needed. More advanced techniques may also be used, such as a timecode generator that sends the same timecode signal to all cameras. In post-production a marker may be placed on the sync frame to help temporally align multiple angles for editing. Continuous timecode is necessary to enable computers to automatically capture from tape. To ensure that the timecode on a tape has not been broken, one may consider “blackening the tape”- recording black on the tape from beginning to end prior to use. This technique lays down seamless timecode for the duration of the tape that can be referenced during future shooting segments. Some cameras manage to maintain a continuously increasing timecode without blackening, especially if Pause is used between shoots rather than Stop. Also, having extra footage at the end of each segment allows for overlapping the follow-up recording session onto the tail of the previous shot. This normally prevents a timecode break. 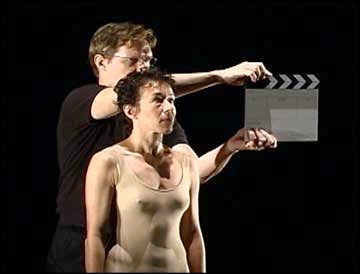
Tim Glenn synchronizes a multi-camera documentation with dancer Beatrice Corbin.![]()
Issue – Pre-roll
Cameras and computers benefit from the inclusion of pre-roll on a video tape. Cameras often need a moment to get up to speed prior to recording and computers sometimes require a number of frames prior to capturing. Additionally, the first part of the tape on a video cassette is most vulnerable to damage as it is located on the exterior of the tape roll when purchased.
Techniques/Recommendations
Video is relatively inexpensive, so there is no need to skimp on recording footage. Each time a new tape is inserted a minimum of 30 seconds of pre-roll is recommended.
At the start of intermittent recording sessions a minimum of five seconds of pre-roll is recommended and at the end of each take, a tail of at least five seconds should be added. ![]()
Issue – Monitoring the Shoot
Dance documentation, particularly using multiple cameras, can benefit greatly from the use of external video monitors. Camera eyepieces and LCD monitors are often spatially inaccurate and too small to provide adequate detail within the frame. Shooting without a monitor can result in a number of unintended variations not perceived during the shoot that may require reshooting.
Techniques/Recommendations
It is always recommended that an external video monitor be used when documenting dance. A high-resolution, professional monitor is best, but an inexpensive, consumer-level television monitor can also be beneficial. A portable monitor, 9” to 13”, is ideal. The monitor should be placed at a comfortable viewing angle easily seen with a shift of the eyes from the camera’s eyepiece. Remember that monitors typically have their own brightness, contrast, and color adjustments, and may result in an undesirable image. These can be modified to simulate the reality of the viewed image, but external monitors are not necessarily recommended for determining image adjustments during recording. Since external monitors represent a more accurate frame, their greatest benefit is in accurately framing the proscenium and in making spatial choices when conducting a follow shot. Side-by-side monitors allow for comparison of focus, white balance, and exposure, as well as matching compositional elements such as pan, zoom, and tilt. Since these monitors may not be placed directly beside the camera, long S-video cables may be needed. Tests may be conducted with your particular combination of camera and monitor to determine spatial accuracy within the frame by viewing a grid or a rectangular image of the same ratio as the desired viewing image. Note the framing discrepancies between the monitor and eyepiece. ![]()
Issue – Tape Labels
It is well worth the time to standardize and implement a detailed labeling system for your video collection. The information contained on a video label can be invaluable, especially in the case of a lost tape. Improperly labeled tapes can lead to hours of timely previewing to determine content.
Techniques/Recommendations
Tape labels should at least include: descriptive name, date with year, format, duration, contact information. Tapes often end up in the wrong cases, therefore it is recommended that labels be placed directly on the tape. Case labels are optional, if the tape label is visible from within the case. This prevents the need to locate the exact case for each tape and saves a little time. If digital videos are dubbed to replacement tapes or migrated to other formats, this information should also be included. Tapes should be stored vertically with the labels visible. ![]()
Issue – Interactive Media Design
One of the greatest benefits of technology is the ability to efficiently access media. The designers of interactive media products are able to make use of available technologies to facilitate the need within the dance field for easy access to dance documentation. Media design for dance documentation and reconstruction purposes is different than that of products designed for entertaining the general public. And, archival formats may vary from distribution media. Nonetheless, the function of a dance documentation product must be considered when developing the navigation for an interactive media product. One may choose to make a comparison to a time capsule containing detailed information to be shared.
Techniques/Recommendations
The process of documenting dance brings with it the implication that the product of documentation is to be shared with someone in the future. Otherwise, why document dance? So, even before a single camera begins to record, one must consider how the documented information is to be received. To categorize the possibilities, let’s consider products intended for sharing dance with the general public, and products containing detailed information designed for those restaging the dance. The mass produced and distributed product might adopt the format of your typical DVD-video menu. Designing navigation for the detailed product is where media design takes an exciting turn to further distinguish the area of dance documentation. Here, the needs of the dancer, choreographer, and rehearsal director must be taken into consideration. An organized menu of chapter markers can facilitate easy access to an exact moment in the dance. At the click of a remote control one can choose a movement phrase from multiple angles, or go directly to the close-up shot of an intricate choreographic moment. One can view the dance from the dancer’s perspective, or even hear the choreographer’s voice coaching the dance rhythmically and qualitatively. The technologies of today even allow for immediate switching of camera angles while continuously viewing. ![]()
Issue – Bows
For some choreographers, the details of a dance’s bow are important and worthy of documentation. This documentation may be necessary to capture the stylized choreographic nuances of the bow, or simply to record the sequence of acknowledging specialty bows such as soloists, duets, etc.
Techniques/Recommendations
Cameras should continue to record until the end of applause, including bows. During a documentation session particular attention should be given to recording bows. Bows are often the best way to identify cast members. One may consider including a close-up of each dancer and having them state their name.
Bow from Klezmerbluegrass by Paul Taylor
Bow Credits from In the Beginning by Paul Taylor
To contribute to this list of issues and techniques/recommendations, contact DanceDocumentation.com.
Banner image from the video documentation of Clarion by Rick McCullough, 2015